17.8.1 NCNN部署
1.在电脑端使用ncnn实现分类(alexnet)
s1,安装g++,cmake,protobuf,opencv
s2,对源码进行编译
git clone https://github.com/Tencent/ncnn $ cd <ncnn-root-dir>$ mkdir -p build$ cd build$ cmake .. $ make -j4
s3,准备caffe模型文件(alexnet)
deploy.prototxt
snapshot_10000.caffemodel
alexnet deploy.prototxt , caffemodel
s4,使用ncnn转换工具将旧caffe版本的prototxt和caffemodel转新版本
将旧caffe版本的prototxt和caffemodel存放在caffe/build/tools目录下,执行如下命令完成转换
./upgrade_net_proto_text [old prototxt] [new prototxt]
./upgrade_net_proto_binary [old caffemodel] [new caffemodel]
s5,将deploy.prototxt中输入层替换成input层(如果只读取一张图片将dim设置为1)
layer {
  name: "data"
  type: "Input"
  top: "data"
  input_param { shape: { dim: 1 dim: 3 dim: 227 dim: 227 } }
}
s6,使用caffe2ncnn工具将caffe model转成ncnn model
./caffe2ncnn deploy.prototxt bvlc_alexnet.caffemodel alexnet.param alexnet.bin
在ncnn/build/tools目录下生成param和bin文件。
s7,对模型参数进行加密
./ncnn2mem alexnet.param alexnet.bin alexnet.id.h alexnet.mem.h
在ncnn/build/tools目录下生成.param、.bin和.h文件。
alexnet.param 网络的模型参数
alexnet.bin 网络的权重
alexnet.id.h 在预测图片的时候使用到
s8,编写pc端代码(参考https://blog.csdn.net/qq_36982160/article/details/79929869 )
#include <stdio.h> #include <algorithm> #include <vector> #include "gesture.id.h" #include "net.h" static int detect_squeezenet ( float *data, std::vector<float >& cls_scores) ncnn::Net squeezenet; int a=squeezenet.load_param ("demo.param" ); int b=squeezenet.load_param_bin ("demo.bin" ); ncnn::Mat in = ncnn::Mat (550 , 8 , 2 , data); ncnn::Extractor ex = squeezenet.create_extractor (); ex.set_light_mode (true ); int d= ex.input ("data" , in); ncnn::Mat out; int c=ex.extract ("prob" , out); cls_scores.resize (out.w); for (int j=0 ; j<out.w; j++) { cls_scores[j] = out[j]; } return 0 ; } int main (int argc, char ** argv) const char * imagepath1 = argv[1 ]; const char * imagepath2=argv[2 ]; FILE *fopeni=NULL ; FILE *fopenq=NULL ; fopeni=fopen (imagepath1,"r" ); fopenq=fopen (imagepath2,"r" ); float i[4400 ]; float q[4400 ]; float data[8800 ]; int count=4400 ; for (int j = 0 ; j < count; ++j) { fscanf (fopeni,"%f" ,&i[j]); fscanf (fopenq,"%f" ,&q[j]); } for (int j = 0 ; j < 8800 ; ++j) { if (j<4400 ) { data[j]=i[j]; } else { data[j]=q[j-4400 ]; } } char a[13 ]={'A' ,'B' ,'C' ,'F' ,'G' ,'H' ,'I' ,'J' ,'K' ,'L' ,'M' ,'N' ,'O' }; std::vector<float > cls_scores; detect_squeezenet (data, cls_scores); for (int i = 0 ; i < cls_scores.size (); ++i) { printf ("%c : %f\n" , a[i],cls_scores[i]); } return 0 ; }
代码是最简单的ncnn使用场景,可以根据自己需求加入代码。
s9,编译代码
(1) 编写CMakeLists.txt
在CMakeLists.txt增加如下两行代码
add_executable(demo demo.cpp)
target_link_libraries(demo ncnn)
CMakeLists.txt如下
find_package(OpenCV QUIET COMPONENTS core highgui imgproc imgcodecs)
if(NOT OpenCV_FOUND)
	find_package(OpenCV REQUIRED COMPONENTS core highgui imgproc)
endif()

include_directories(${CMAKE_CURRENT_SOURCE_DIR}/../src)
include_directories(${CMAKE_CURRENT_BINARY_DIR}/../src)

add_executable(squeezenet squeezenet.cpp)

target_link_libraries(squeezenet ncnn ${OpenCV_LIBS})

add_executable(fasterrcnn fasterrcnn.cpp)
target_link_libraries(fasterrcnn ncnn ${OpenCV_LIBS})

add_executable(demo demo.cpp)
target_link_libraries(demo ncnn)

add_subdirectory(ssd)
(2) 在ncnn根目录下CMakeLists.txt中编译examples语句的注释去掉
##############################################

# add_subdirectory(examples)
# add_subdirectory(benchmark)
add_subdirectory(src)
if(NOT ANDROID AND NOT IOS)
add_subdirectory(tools)
endif()
(3)ncnn/build目录下进行编译,生成demo可执行文件
s10,执行
将生成的.param和.bin文件复制到ncnn/build/examples目录下,然后终端cd到ncnn/build/examples,执行:
./demo data_path1 data_path2
s1,安装Visual Studio Community 2017
download Visual Studio Community 2017 from https://visualstudio.microsoft.com/vs/community/
install it
Start → Programs → Visual Studio 2017 → Visual Studio Tools → x64 Native Tools Command Prompt for VS 2017
s2,编译protobuf
download protobuf-3 .4.0 from https://github.com/google/protobuf/archive/v3.4.0 .zip > cd <protobuf-root-dir > > mkdir build-vs2017 > cd build-vs2017 > cmake -G "NMake Makefiles" -DCMAKE_BUILD_TYPE =Release -DCMAKE_INSTALL_PREFIX =%cd %/install -Dprotobuf_BUILD_TESTS =OFF -Dprotobuf_MSVC_STATIC_RUNTIME =OFF ../cmake > nmake > nmake install
s3,编译ncnn库
> cd <ncnn-root-dir > > mkdir -p build-vs2017 > cd build-vs2017 > cmake -G "NMake Makefiles" -DCMAKE_BUILD_TYPE =Release -DCMAKE_INSTALL_PREFIX =%cd %/install -DProtobuf_INCLUDE_DIR =<protobuf-root-dir >/build-vs2017 /install/include -DProtobuf_LIBRARIES =<protobuf-root-dir >/build-vs2017 /install/lib/libprotobuf.lib -DProtobuf_PROTOC_EXECUTABLE =<protobuf-root-dir >/build-vs2017 /install/bin/protoc.exe .. > nmake > nmake install pick build-vs2017 /install folder for further usage
3. Android端使用ncnn
参考:
https://blog.csdn.net/qq_33200967/article/details/82421089
https://blog.csdn.net/qq_36982160/article/details/79931741
s1,使用Android Studio安装ndk
1)打开Android Studio,依次点击File->Settings->Appearance&Behavior->System Settings->Android SDK->SDK Tool,选中NDK,点击apply自动下载安装(如果安装成功会在SDK目录下生成ndk-bundle文件夹);
2)配置ndk的环境变量
打开profile
在profile文件末尾添加ndk路径
export NDK_HOME=sdkroot/ndk-bundle
PATH=$NDK_HOME:$PATH
保存退出,使用source命令使环境变量生效
验证ndk是否配置成功
s2,编译ncnn sdk
通过如下命令编译ncnn sdk,会在ncnn/build-android下生成install文件夹,其中包括:include(调用ncnn所需的头文件)和lib(编译得到的ncnn库libncnn.a)
mkdir build-android
cd build-android
cmake -DCMAKE_TOOLCHAIN_FILE=$ANDROID_NDK/build/cmake/android.toolchain.cmake \
    -DANDROID_ABI="armeabi-v7a" -DANDROID_ARM_NEON=ON \
    -DANDROID_PLATFORM=android-14 ..
make
make install
make package
参数设置请参考:https://github.com/Tencent/ncnn/wiki/cmake-打包-android-sdk
ANDROID_ABI 是架构名字,"armeabi-v7a" 支持绝大部分手机硬件
ANDROID_ARM_NEON 是否使用 NEON 指令集,设为 ON 支持绝大部分手机硬件
ANDROID_PLATFORM 指定最低系统版本,"android-14" 就是 android-4.0
s3,对源码进行编译
git clone https://github.com/Tencent/ncnn $ cd <ncnn-root-dir>$ mkdir -p build$ cd build$ cmake .. $ make -j4
s4,准备caffe模型文件(alexnet)
deploy.prototxt
snapshot_10000.caffemodel
alexnet deploy.prototxt , caffemodel
s5,使用ncnn转换工具将旧caffe版本的prototxt和caffemodel转新版本
将旧caffe版本的prototxt和caffemodel存放在caffe/build/tools目录下,执行如下命令完成转换
./upgrade_net_proto_text [old prototxt] [new prototxt]
./upgrade_net_proto_binary [old caffemodel] [new caffemodel]
s6,将deploy.prototxt中输入层替换成input层(如果只读取一张图片将dim设置为1)
layer {
  name: "data"
  type: "Input"
  top: "data"
  input_param { shape: { dim: 1 dim: 3 dim: 227 dim: 227 } }
}
s7,使用caffe2ncnn工具将caffe model转成ncnn model
./caffe2ncnn deploy.prototxt bvlc_alexnet.caffemodel alexnet.param alexnet.bin
在ncnn/build/tools目录下生成param和bin文件。
s8,对模型参数进行加密
./ncnn2mem alexnet.param alexnet.bin alexnet.id.h alexnet.mem.h
在ncnn/build/tools目录下生成.param、.bin和.h文件。
alexnet.param 网络的模型参数
alexnet.bin 网络的权重
alexnet.id.h 在预测图片的时候使用到
s9,开发安卓项目
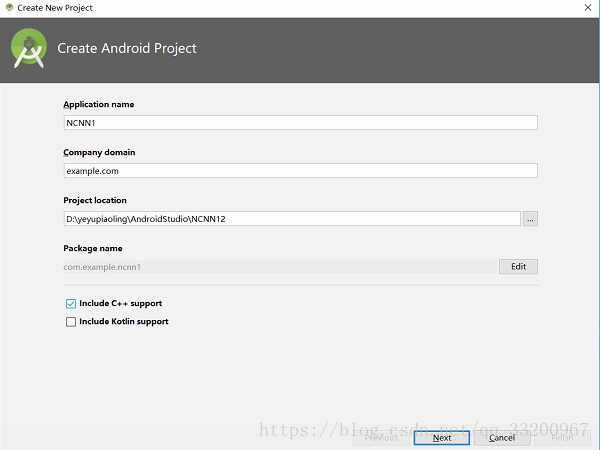
(1)在Android Studio上创建一个NCNN1,并选择Include C++ support
(2)在main目录下创建assets目录,并将alexnet.param、alexnet.bin、label.txt拷贝其中
(3)将include文件夹和 alexnet.id.h拷贝到cpp目录下
(4)在main目录下创建jniLibs/armeabi-v7a/目录,并将alexnet.id.h 拷贝其中
(5)在cpp文件夹下创建C++文件,用于加载模型和预测图片
#include <android/bitmap.h> #include <android/log.h> #include <jni.h> #include <string> #include <vector> #include "include/net.h" #include "alexnet.id.h" #include <sys/time.h> #include <unistd.h> static ncnn::UnlockedPoolAllocator g_blob_pool_allocator; static ncnn::PoolAllocator g_workspace_pool_allocator; static ncnn::Mat ncnn_param; static ncnn::Mat ncnn_bin; static ncnn::Net ncnn_net; extern "C" { Java_com_example_ncnn1_NcnnJni_Init (JNIEnv *env, jobject thiz, jbyteArray param, jbyteArray bin) { { int len = env->GetArrayLength (param); ncnn_param.create (len, (size_t ) 1u ); env->GetByteArrayRegion (param, 0 , len, (jbyte *) ncnn_param); int ret = ncnn_net.load_param ((const unsigned char *) ncnn_param); __android_log_print(ANDROID_LOG_DEBUG, "NcnnJni" , "load_param %d %d" , ret, len); } { int len = env->GetArrayLength (bin); ncnn_bin.create (len, (size_t ) 1u ); env->GetByteArrayRegion (bin, 0 , len, (jbyte *) ncnn_bin); int ret = ncnn_net.load_model ((const unsigned char *) ncnn_bin); __android_log_print(ANDROID_LOG_DEBUG, "NcnnJni" , "load_model %d %d" , ret, len); } ncnn::Option opt; opt.lightmode = true ; opt.num_threads = 4 ; opt.blob_allocator = &g_blob_pool_allocator; opt.workspace_allocator = &g_workspace_pool_allocator; ncnn::set_default_option (opt); return JNI_TRUE; } JNIEXPORT jfloatArray JNICALL Java_com_example_ncnn1_NcnnJni_Detect (JNIEnv* env, jobject thiz, jobject bitmap) ncnn::Mat in; { AndroidBitmapInfo info; AndroidBitmap_getInfo (env, bitmap, &info); int width = info.width; int height = info.height; if (info.format != ANDROID_BITMAP_FORMAT_RGBA_8888) return NULL ; void * indata; AndroidBitmap_lockPixels (env, bitmap, &indata); in = ncnn::Mat::from_pixels ((const unsigned char *)indata, ncnn::Mat::PIXEL_RGBA2BGR, width, height); AndroidBitmap_unlockPixels (env, bitmap); } std::vector<float > cls_scores; { const float mean_vals[3 ] = {103.94f , 116.78f , 123.68f }; const float scale[3 ] = {0.017f , 0.017f , 0.017f }; in.substract_mean_normalize (mean_vals, scale); ncnn::Extractor ex = ncnn_net.create_extractor (); ex.input (mobilenet_v2_param_id::BLOB_data, in); ncnn::Mat out; ex.extract (mobilenet_v2_param_id::BLOB_prob, out); int output_size = out.w; jfloat *output[output_size]; for (int j = 0 ; j < out.w; j++) { output[j] = &out[j]; } jfloatArray jOutputData = env->NewFloatArray (output_size); if (jOutputData == nullptr ) return nullptr ; env->SetFloatArrayRegion (jOutputData, 0 , output_size, reinterpret_cast <const jfloat *>(*output)); return jOutputData; } } }
(6)在项目包com.example.ncnn1下,修改MainActivity.java中的代码
package com.example.ncnn1; import android.Manifest; import android.app.Activity; import android.content.Intent; import android.content.pm.PackageManager; import android.content.res.AssetManager; import android.graphics.Bitmap; import android.graphics.BitmapFactory; import android.net.Uri; import android.os.Bundle; import android.support.annotation.NonNull; import android.support.annotation.Nullable; import android.support.v4.app.ActivityCompat; import android.support.v4.content.ContextCompat; import android.text.method.ScrollingMovementMethod; import android.util.Log; import android.view.View; import android.widget.Button; import android.widget.ImageView; import android.widget.TextView; import android.widget.Toast; import com.bumptech.glide.Glide; import com.bumptech.glide.load.engine.DiskCacheStrategy; import com.bumptech.glide.request.RequestOptions; import java.io.BufferedReader; import java.io.FileNotFoundException; import java.io.IOException; import java.io.InputStream; import java.io.InputStreamReader; import java.util.ArrayList; import java.util.Arrays; import java.util.List; public class MainActivity extends Activity { private static final String TAG = MainActivity.class.getName(); private static final int USE_PHOTO = 1001 ; private String camera_image_path; private ImageView show_image; private TextView result_text; private boolean load_result = false ; private int [] ddims = {1 , 3 , 224 , 224 }; private int model_index = 1 ; private List<String> resultLabel = new ArrayList <>(); private NcnnJni squeezencnn = new NcnnJni (); @Override public void onCreate (Bundle savedInstanceState) { super .onCreate(savedInstanceState); setContentView(R.layout.activity_main); try { initSqueezeNcnn(); } catch (IOException e) { Log.e("MainActivity" , "initSqueezeNcnn error" ); } init_view(); readCacheLabelFromLocalFile(); } private void initSqueezeNcnn () throws IOException { byte [] param = null ; byte [] bin = null ; { InputStream assetsInputStream = getAssets().open("mobilenet_v2.param.bin" ); int available = assetsInputStream.available(); param = new byte [available]; int byteCode = assetsInputStream.read(param); assetsInputStream.close(); } { InputStream assetsInputStream = getAssets().open("mobilenet_v2.bin" ); int available = assetsInputStream.available(); bin = new byte [available]; int byteCode = assetsInputStream.read(bin); assetsInputStream.close(); } load_result = squeezencnn.Init(param, bin); Log.d("load model" , "result:" + load_result); } private void init_view () { request_permissions(); show_image = (ImageView) findViewById(R.id.show_image); result_text = (TextView) findViewById(R.id.result_text); result_text.setMovementMethod(ScrollingMovementMethod.getInstance()); Button use_photo = (Button) findViewById(R.id.use_photo); use_photo.setOnClickListener(new View .OnClickListener() { @Override public void onClick (View view) { if (!load_result) { Toast.makeText(MainActivity.this , "never load model" , Toast.LENGTH_SHORT).show(); return ; } PhotoUtil.use_photo(MainActivity.this , USE_PHOTO); } }); } private void readCacheLabelFromLocalFile () { try { AssetManager assetManager = getApplicationContext().getAssets(); BufferedReader reader = new BufferedReader (new InputStreamReader (assetManager.open("synset.txt" ))); String readLine = null ; while ((readLine = reader.readLine()) != null ) { resultLabel.add(readLine); } reader.close(); } catch (Exception e) { Log.e("labelCache" , "error " + e); } } @Override protected void onActivityResult (int requestCode, int resultCode, @Nullable Intent data) { String image_path; RequestOptions options = new RequestOptions ().skipMemoryCache(true ).diskCacheStrategy(DiskCacheStrategy.NONE); if (resultCode == Activity.RESULT_OK) { switch (requestCode) { case USE_PHOTO: if (data == null ) { Log.w(TAG, "user photo data is null" ); return ; } Uri image_uri = data.getData(); Glide.with(MainActivity.this ).load(image_uri).apply(options).into(show_image); image_path = PhotoUtil.get_path_from_URI(MainActivity.this , image_uri); predict_image(image_path); break ; } } } private void predict_image (String image_path) { Bitmap bmp = PhotoUtil.getScaleBitmap(image_path); Bitmap rgba = bmp.copy(Bitmap.Config.ARGB_8888, true ); Bitmap input_bmp = Bitmap.createScaledBitmap(rgba, ddims[2 ], ddims[3 ], false ); try { long start = System.currentTimeMillis(); float [] result = squeezencnn.Detect(input_bmp); long end = System.currentTimeMillis(); Log.d(TAG, "origin predict result:" + Arrays.toString(result)); long time = end - start; Log.d("result length" , String.valueOf(result.length)); int r = get_max_result(result); String show_text = "result:" + r + "\nname:" + resultLabel.get(r) + "\nprobability:" + result[r] + "\ntime:" + time + "ms" ; result_text.setText(show_text); } catch (Exception e) { e.printStackTrace(); } } private int get_max_result (float [] result) { float probability = result[0 ]; int r = 0 ; for (int i = 0 ; i < result.length; i++) { if (probability < result[i]) { probability = result[i]; r = i; } } return r; } private void request_permissions () { List<String> permissionList = new ArrayList <>(); if (ContextCompat.checkSelfPermission(this , Manifest.permission.CAMERA) != PackageManager.PERMISSION_GRANTED) { permissionList.add(Manifest.permission.CAMERA); } if (ContextCompat.checkSelfPermission(this , Manifest.permission.WRITE_EXTERNAL_STORAGE) != PackageManager.PERMISSION_GRANTED) { permissionList.add(Manifest.permission.WRITE_EXTERNAL_STORAGE); } if (ContextCompat.checkSelfPermission(this , Manifest.permission.READ_EXTERNAL_STORAGE) != PackageManager.PERMISSION_GRANTED) { permissionList.add(Manifest.permission.READ_EXTERNAL_STORAGE); } if (!permissionList.isEmpty()) { ActivityCompat.requestPermissions(this , permissionList.toArray(new String [permissionList.size()]), 1 ); } } @Override public void onRequestPermissionsResult (int requestCode, @NonNull String[] permissions, @NonNull int [] grantResults) { super .onRequestPermissionsResult(requestCode, permissions, grantResults); switch (requestCode) { case 1 : if (grantResults.length > 0 ) { for (int i = 0 ; i < grantResults.length; i++) { int grantResult = grantResults[i]; if (grantResult == PackageManager.PERMISSION_DENIED) { String s = permissions[i]; Toast.makeText(this , s + " permission was denied" , Toast.LENGTH_SHORT).show(); } } } break ; } } }
(7)在项目的包com.example.ncnn1下,创建一个NcnnJni.java类,用于提供JNI接口,代码如下:
package com.example.ncnn1; import android.graphics.Bitmap; public class NcnnJni { public native boolean Init (byte [] param, byte [] bin) ; public native float [] Detect(Bitmap bitmap); static { System.loadLibrary("ncnn_jni" ); } }
(8)在项目的包com.example.ncnn1下,创建一个PhotoUtil.java类,这个是图片的工具类,代码如下:
package com.example.ncnn1; import android.app.Activity; import android.content.Context; import android.content.Intent; import android.database.Cursor; import android.graphics.Bitmap; import android.graphics.BitmapFactory; import android.net.Uri; import android.provider.MediaStore; import java.nio.FloatBuffer; public class PhotoUtil { public static void use_photo (Activity activity, int requestCode) { Intent intent = new Intent (Intent.ACTION_PICK); intent.setType("image/*" ); activity.startActivityForResult(intent, requestCode); } public static String get_path_from_URI (Context context, Uri uri) { String result; Cursor cursor = context.getContentResolver().query(uri, null , null , null , null ); if (cursor == null ) { result = uri.getPath(); } else { cursor.moveToFirst(); int idx = cursor.getColumnIndex(MediaStore.Images.ImageColumns.DATA); result = cursor.getString(idx); cursor.close(); } return result; } public static Bitmap getScaleBitmap (String filePath) { BitmapFactory.Options opt = new BitmapFactory .Options(); opt.inJustDecodeBounds = true ; BitmapFactory.decodeFile(filePath, opt); int bmpWidth = opt.outWidth; int bmpHeight = opt.outHeight; int maxSize = 500 ; opt.inSampleSize = 1 ; while (true ) { if (bmpWidth / opt.inSampleSize < maxSize || bmpHeight / opt.inSampleSize < maxSize) { break ; } opt.inSampleSize *= 2 ; } opt.inJustDecodeBounds = false ; return BitmapFactory.decodeFile(filePath, opt); } }
(9)修改启动页面的布局,修改如下:
<?xml version="1.0" encoding="utf-8" ?> <RelativeLayout xmlns:android ="http://schemas.android.com/apk/res/android" xmlns:app ="http://schemas.android.com/apk/res-auto" xmlns:tools ="http://schemas.android.com/tools" android:layout_width ="match_parent" android:layout_height ="match_parent" tools:context =".MainActivity" > <LinearLayout android:id ="@+id/btn_ll" android:layout_alignParentBottom ="true" android:layout_width ="match_parent" android:layout_height ="wrap_content" android:orientation ="horizontal" > <Button android:id ="@+id/use_photo" android:layout_weight ="1" android:layout_width ="0dp" android:layout_height ="wrap_content" android:text ="相册" /> </LinearLayout > <TextView android:layout_above ="@id/btn_ll" android:id ="@+id/result_text" android:textSize ="16sp" android:layout_width ="match_parent" android:hint ="预测结果会在这里显示" android:layout_height ="100dp" /> <ImageView android:layout_alignParentTop ="true" android:layout_above ="@id/result_text" android:id ="@+id/show_image" android:layout_width ="match_parent" android:layout_height ="match_parent" /> </RelativeLayout >
(10)修改APP目录下的CMakeLists.txt文件,修改如下:
# For more information about using CMake with Android Studio, read the
# documentation: https://d.android.com/studio/projects/add-native-code.html

# Sets the minimum version of CMake required to build the native library.

cmake_minimum_required(VERSION 3.4.1)

# Creates and names a library, sets it as either STATIC
# or SHARED, and provides the relative paths to its source code.
# You can define multiple libraries, and CMake builds them for you.
# Gradle automatically packages shared libraries with your APK.
set(ncnn_lib ${CMAKE_SOURCE_DIR}/src/main/jniLibs/armeabi-v7a/libncnn.a)
add_library (ncnn_lib STATIC IMPORTED)
set_target_properties(ncnn_lib PROPERTIES IMPORTED_LOCATION ${ncnn_lib})

add_library( # Sets the name of the library.
			ncnn_jni
			# Sets the library as a shared library.
			SHARED

			# Provides a relative path to your source file(s).
			src/main/cpp/ncnn_jni.cpp )

# Searches for a specified prebuilt library and stores the path as a
# variable. Because CMake includes system libraries in the search path by
# default, you only need to specify the name of the public NDK library
# you want to add. CMake verifies that the library exists before
# completing its build.

find_library( # Sets the name of the path variable.
				log-lib

				# Specifies the name of the NDK library that
				# you want CMake to locate.
				log )

# Specifies libraries CMake should link to your target library. You
# can link multiple libraries, such as libraries you define in this
# build script, prebuilt third-party libraries, or system libraries.

target_link_libraries( # Specifies the target library.
						ncnn_jni
						ncnn_lib
						jnigraphics

						# Links the target library to the log library
						# included in the NDK.
						${log-lib} )
(11)修改APP目录下的build.gradle文件,修改如下:
apply plugin: 'com.android.application'

android {
	compileSdkVersion 28
	defaultConfig {
		applicationId "com.example.ncnn1"
		minSdkVersion 21
		targetSdkVersion 28
		versionCode 1
		versionName "1.0"
		testInstrumentationRunner "android.support.test.runner.AndroidJUnitRunner"
		externalNativeBuild {
			cmake {
				cppFlags "-std=c++11 -fopenmp"
				abiFilters "armeabi-v7a"
			}
		}
	}
	buildTypes {
		release {
			minifyEnabled false
			proguardFiles getDefaultProguardFile('proguard-android.txt'), 'proguard-rules.pro'
		}
	}
	externalNativeBuild {
		cmake {
			path "CMakeLists.txt"
		}
	}

	sourceSets {
		main {
			jniLibs.srcDirs = ["src/main/jniLibs"]
			jni.srcDirs = ['src/cpp']
		}
	}
}

dependencies {
	implementation fileTree(dir: 'libs', include: ['*.jar'])
	implementation 'com.android.support:appcompat-v7:28.0.0-rc02'
	implementation 'com.android.support.constraint:constraint-layout:1.1.3'
	testImplementation 'junit:junit:4.12'
	implementation 'com.github.bumptech.glide:glide:4.3.1'
	androidTestImplementation 'com.android.support.test:runner:1.0.2'
	androidTestImplementation 'com.android.support.test.espresso:espresso-core:3.0.2'
}
(12)最后在配置文件中添加权限
<uses-permission android:name ="android.permission.READ_EXTERNAL_STORAGE" /> <uses-permission android:name ="android.permission.WRITE_EXTERNAL_STORAGE" />
(13)编译完成